

Burn brown grocery bags to create decorative ivy with the look of metal. Heidi Borchers of Inspired at Home shows us how.
This technique was discovered by Katy Ogle in the 1960’s when she was testing the Aleene’s Tacky Glue for flammability. Who would have ever thought that you could burn glue to create the look of metal!
Materials
- Aleene’s Tacky Glue or Aleene’s Thick Designer Tacky Glue
- 18 gauge florist wire
- Brown grocery bags
- Florist tape
- Rub ‘n Buff – metallic copper
- Acrylic paint – patina green, leaf green, black
- Plumbers candle (or other candle with tall flame)
- Small tree branch
- Soft cloth (for wiping away soot)
- Scissors
Instructions
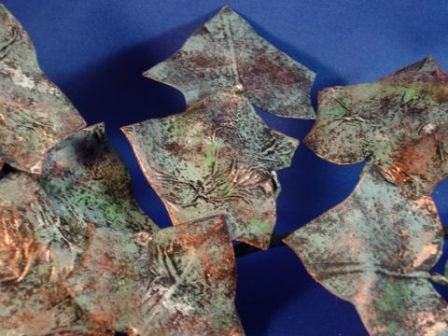
- Following the Burnt Brown Bag Technique to create individual leaves by transferring ivy design to grocery bag, applying glue, burning each leaf and wipe away soot. Repeat technique on back side of leaf. While leaf is still pliable, gently bend to add shaping. Apply antiquing colors (see Heidi’s tips below). Let dry.
- To create branch effect, wrap each leaf wire stem with florist tape. (Remember that to “activate” florist tape, you need to gently stretch the tape before wrapping around the wire.) After stem wires are taped, gently bend the wires to give more realistic shaping.
- Determine placement and tape each leaf to branch where desired. Add second layer of tape to entire branch starting at one end and wrapping to the other end. This will help to resecure everything. Paint branch and leaf stems with black acrylic paint. Let dry. Apply copper antiquing over stems and branch. Let dry.
Heidi’s Designer Tips: It’s really fun to experiment with different “antiquing” variations. On this design I used copper Rub ‘n Buff along with two colors of green acrylic paints to achieve a patina effect. For easiest application and great results, just dip your finger into the paint (or Rub ‘n Buff), gently wipe off excess onto a paper towel, and use your finger to apply in a “dry brush” effect. Repeat for each color. Be sure to leave some of the burnt black showing through. This gives the leaves interesting coloring and texture.
image: http://www.favecrafts.com/master_images/Unexpected-Ideas/BBB_ivy_cu.jpg

Read more at http://www.favecrafts.com/Unexpected-Ideas/Burnt-Brown-Bag-Ivy#ewpk1Humw96I7a8S.99


